
Drawing a Complex Flower Structure: Rose
- Dianne Sutherland

- Jul 18
- 3 min read
Many flowers have overlapping petals or multiple structural components, which can make them challenging to illustrate, especially for those at the beginning of their botanical art journey. There are several strategies that help you make sense of these parts and approach the drawing systematically. It is not necessary to produce a perfect drawing at the outset - you will use many light, exploratory construction lines as you build the structure. These can be refined gradually, and the final drawing can be transferred to your working paper later if needed.
The most effective approach is to break the structure down into understandable elements such as shapes and angles. Take this rose, for example: although it contains many individual petals, it can be understood as two main clusters — a central, 'ball-shaped' core and an outer ring of petals.
Observation, Measurement, Anchor Points, and Angles
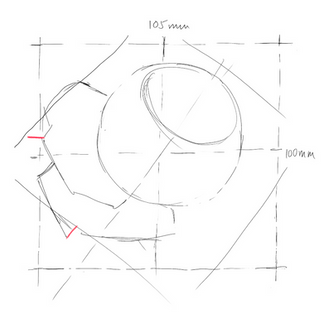
Begin by assessing the overall shape of the flower and the space it occupies. Measure the height and width and plot these on your paper. This is no different from drawing any measured subject, but the overlapping parts can make it appear more complex.
Next, draw horizontal and vertical centre lines (shown here in blue). These act as anchor points that help you locate the position of each petal. You can think of these outer points as a clock face: the top is 12 o’clock, the right is 3, the bottom is 6, and the left is 9. This simple reference system makes it easier to plot petal positions. Degrees can be used instead, but the clock‑face method is often more intuitive.
Add a diagonal line to indicate the axis or angle of the flower (shown here in green).
Identify the inner ball‑like cluster of petals and measure and do the same with the outer margin of petals (in black). this only has to be rough shapes at this point and this separation will help you understand the structure before refining the details.

Once you have established the basic size, shape, and angle of the flower, you can begin to add individual petals.
Identify a clear anchor point, such as the petal positioned at 9 o’clock on the left‑hand side. I often think of certain distinctive petals as 'landing sites' forms that you can return to if you lose your way in the drawing. By referring back to this petal, you can assess its relationship to the horizontal and vertical centre lines and to the central point of the flower.
Begin with one petal, carefully plotting its angle, then add additional petals, measuring and comparing each one as you progress. You may choose to establish more than one landing site to strengthen your reference framework. Throughout the process, cross‑check the drawing regularly, asking yourself whether the structure looks correct, and make adjustments as needed.
Below is a short video showing the stages of the working drawing and the final refined drawing.







Drawing Underpins Success
Getting the drawing right is essential to the success of any botanical illustration. If the underlying structure isn’t accurate, problems will almost certainly appear later in the painting process. These strategies may feel complex at first, and you will need to adapt them depending on the flower you are working with, but they will help you make sense of the subject rather than feel overwhelmed by it. With practice, this way of analysing and constructing a drawing becomes intuitive.
Over time, these methods train your eye to recognise structure, proportion, and form, giving you a reliable foundation for any botanical subject you choose to illustrate.
Moving to the Next Stage
You can refine the drawing and begin adding detail once the basic structure is securely in place. At this stage, you can move the work forward - whether your next step is a line drawing, tonal study, or watercolour - with confidence that the underlying structure is accurate. A well constructed foundation allows every subsequent layer to sit correctly, giving you freedom to focus on detail, texture, and form without structural issues emerging later.


Comments