Botanical Art Courses
with Dianne Sutherland......making learning at a distance easier

Guidance on Submitting your Artwork
This webpage provides guidance on capturing your artwork, and submitting it.
Submitting Your Artwork Digitally
Page still is regularly changed due to developments in technology and Apps
Being able to capture high-quality digital images of your artwork—whether by scanning or photographing—is a key skill for any botanical artist. It’s not just about showing your work at its best; poor images are actually one of the most common reasons artwork is rejected from open exhibitions.
The good news is, with a little effort and the right approach, you can produce images that do your work justice.You’ll need these skills for this course, but also for almost every other stage of your artistic journey—submitting to exhibitions, sharing on social media, adding to a website, or even for publication.
So, this is the perfect time to start building some skills in achieving the best images. Different situations will call for slightly different approaches, but we’ll begin with the most immediate need: your course submissions.
For these, your images should be as faithful to the original as possible—true colour, correct proportions, and without distortion.
This isn’t a last minute 'snap and go ' job; it takes time to get right and if you are serious about your work you need to be able to document it. I’ve often have to spend hours cropping, rotating, adjusting, and labelling images student work that was taken in a hurry. A little extra care will save time later and ensure your work looks as good as it can do - even with limited resources.
.
Of course I’m not a professional photographer, but what I’m sharing here is the basics, much of my knowledge comes from trial, error, and problem-solving and some advice from professionals.
With a bit of patience, some practice, and a small investment in basic tools, you’ll be able to produce images that you can feel proud to submit anywhere.

On this page - click to jump to section
Capturing the Image: Camera, Phone or Scanner?
There are numerous ways of capturing artwork - with a camera, smart phone or scanner the last is a perfectly good option provided the device isn't too old, even old iPhones take decent images.
After a recent poll, I found that most students are using a smart phone for their artwork, either Android or Apple IOS, and this is perfectly good provided the photograph is taken properly
For cameras, I can't go into all of the different types but assume that if you will have a basic knowledge of how to use you camera, ideally DSLR or Mirrorless digital camera, Such as the Canon EOS are ideal, but you will need to adapt the settings for photographing artwork and lighting can be an issue- I have previously written a blog post about photographing artwork here - Click here.
A good quality scanner will capture the best high resolution images, but not the type that come with printers as they are usually not good enough, I use and Epson Perfection V550 Photo.
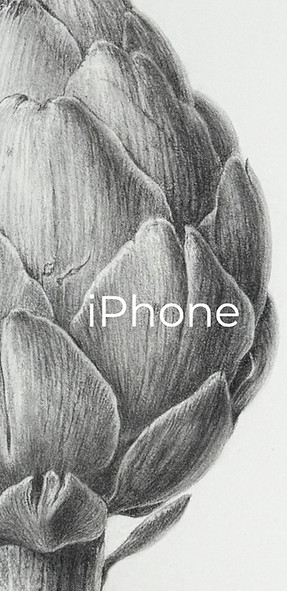
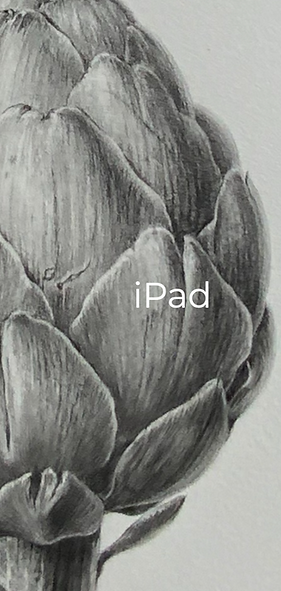
I do not recommend using iPads or similar tablets as they are generally lesser quality cameras, with lower resolutions and with less sophisticated image processing capabilities than phones, they are more suitable for 'face-time' and maybe landscape and family photography but won't capture the detail needed in botanical artwork work, and its almost impossible to hold them still without a tripod, so images tend to be blurred.
Here you can see a detail from and iPhone 16, iPad Pro a using an Epson Perfection V550 scanner. Note the deterioration in image quality in the iPad image, both photographs were take under the same conditions and unedited. Photographs using camera can vary enormously depending on the camera quality, so I haven't included one. But if you know how to use your camera, thats perfect.

Submitting Coursework using Digital Images
Coursework images can be made using photographs or scanning, whatever you choose, the images should be clear to see, cropped to exclude background and files should be named.
In this section I will suggest some different options for capturing artwork, starting with photography and then scanning, followed by a section editing images and finally emailing or using image transfer sites.
Photography and Scanning, Common Problems
There are a few common problems with taking photographs, most notable are blurred or pixellated images and uneven or dark backgrounds, photography can be particularly difficult with graphite images. Further problems can occur whilst emailing the images, this is most common when the images are compressed by the email programme.
With scanning problems are mostly causes by using scanners that are not suitable for scanning
Here are a few tips from my own experience, which might help. You can find information on scanning artwork further down the page.
Photography
Image Set-up Options
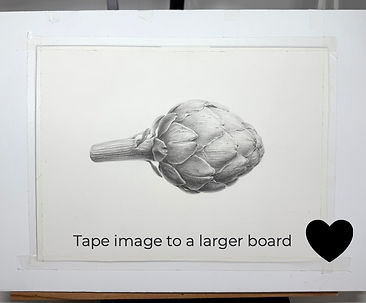
Before you think about taking the photograph, you need to set up the artwork and lighting. I find that it's best to have the work upright and taped to a piece of foam core or card that's larger than the actual work, this can be pale grey or white.
Taping - using low tack tape, such as Washi tape - ensures that the work lies flat and if upright its easier to light and avoid you oven shadow.
If it's in a sketchbook it can lie flat but clip pages flat if needed. .
You can photograph the work on its side or in the correct orientation -it can be rotated later
Positioning the Work
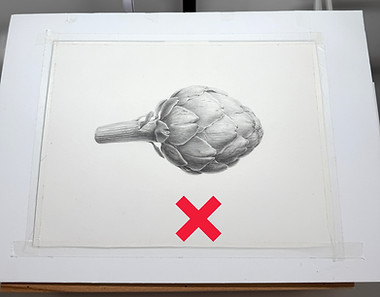
Here I taped my drawing to a white card, the most important next step is to make sure the work is square-on the the camera, as shown in the first image below, and not at an angle, as shown in the second.
Clean
Once the artwork is secured and tripod in place, make sure the artwork is clean, remove any smudges of graphite -which should be minimal - with a putty eraser and use a clean soft brush to remove and dust. Please don't send work with dirty smudges.
Don't Zoom
If you zoom in (or out) too much the image can be distorted. Aim to have the camera at a distance that frames a little more than the actual image, as shown below.
Adjust the Brightness
You may need to adjust the brightness on the screen, to do this: tap on the screens a square or circle will appear with a small lock. Next to it is a slider, slide your finger on it, to increase or decrease brightness. See video section
Use a Tripod
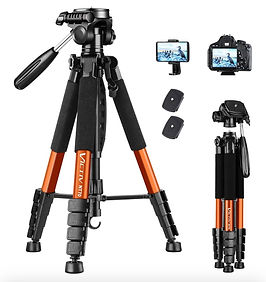
I highly recommend investing in a tripod, regardless of whether you are using a camera or phone. Tripods for this purpose can be relatively inexpensive, at around 15 - 30 gbp for a basic tripod - it's a good investment -and there's no more trying to keep the camera or phone still (setting a timer on the camera reduces movement to nil). You will need a shoe fitting for camera or a phone fitting, some have both, like the Victiv tripod shown here. I also use a desk clamp type holder for phones instead of a tripod but these are only good for smaller works.
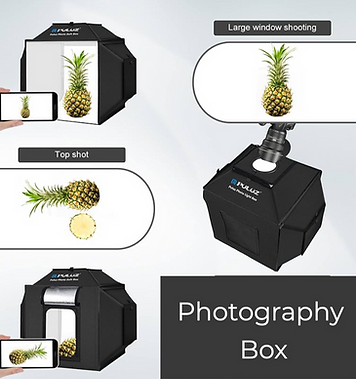
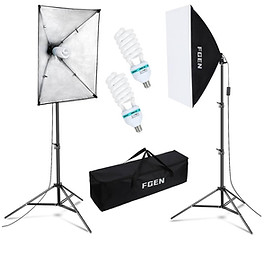
Photography Light Boxes
You may want to consider buying a photography box. If you don't know what one is - it's a box with built in lighting inside of it, these portable boxes are made for photographing products, but give fairly even white lighting for consistent results which are better than natural light. There is usually a hole in the top and the side, so you can photograph from above or from the side, so it also solves the lighting problem - although the image may still need some editing. You can also brighten on the camera or phone settings before taking the photograph.
You will need one large enough for A3 sized paper, ideally around 5500 - 6000 kelvins for white light.
The boxes fold up so can be packed away when not in use. They cost around 40 -90 gbps, the one shown is made by Puluz, you can lay artwork flat in the bottom of the box.
Ring Lamps
Ring lamps are simple lighting tools, typically used by YouTubers but can be used for photographs of artwork too but with mixed results, depending on the quality of the lamp.
If you happen to have one they may well be worth a try.
They have the advantage of casting light all around the subject and a camera or smartphone can be heard in the centre, they also sit on a tripod, so are stable. Most also have different light settings, which includes a daylight setting.
I have take a few images with a ring lamp, and as long as this image isn't too large it can yield pretty good results. You can position the lamp - on its tripod-either vertically in front of the subject or horizontally, directly above, so lying flat. Ring lamps can leave and but it can result in a darker area in the centre

Lighting
Using Natural Light:
Indoor photography can be hit and miss and if you are using natural light it can be more difficult, but if you get the right conditions good results can be achieved. You will definitely need to this on a bright day - not in bright sunlight but too dull either. This can be difficult in your home, where there can be shadows from window frames etc. - it's really about experimenting to find the best spot. Low light will result in blurred images.
You have to be careful not to stand in front of the light source. If you have a tripod use a timer to eliminate shadow from having the light behind you. The image on the right was taken in natural light with and iPhone 16, it was upright and in front of a large window, I brightened it slightly using the brightness option on the phone - of course it's not perfect because the upper left -side is darker than the lower right-side but it is clear and this is good enough for coursework.
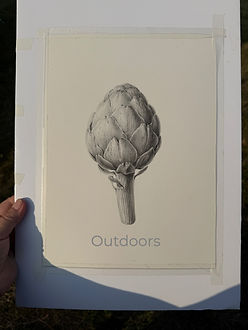
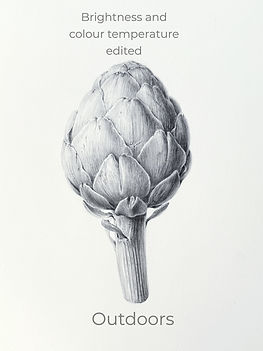
Outdoors photography if it's dry and bright outdoors is a good option too, but of course is highly dependent on conditions. I took the image here on a bright day, with hand held ipPhone 16 phone - bright light does not always require a tripod although it's always wise to use one - you can see my shadow to the side, however, this was not an issue as the image could be cropped. The colour of the light changes depending on conditions, earlier in the day it can be cooler and later on warmer, this image was taken around 4pm in Summer, its very warm light , with a yellow hue to the image, this can be edited after the photograph has been taken using the 'brightness' and the 'warmth' feature on the phone to remove the yellow hue. Note the darker side bottom right.
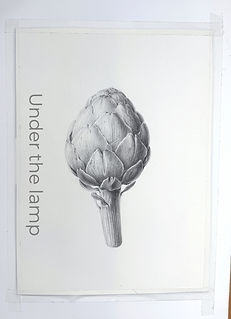
Lamps There are many lamps that you can buy to illuminate the artwork. I took the artichoke image with my iPhone 16 and my my desk easel lamp, which is form Native Lighting, model N1190 Task Lamp, which is similar to lamps by the Daylight Company. The important feature is the 5,500k daylight lamp. The image isn't perfect but is good enough image for small exercises for course work to submit with some minor editing, which can be done on a phone. The movement go the lamp allows for it to be positioned over the artwork for maximum illumination. I took the image sideways because the width of the lamp is better for a portrait shape, the image can then be rotated on screen.
If you are purchasing any type of lamp for photographing artwork they must have daylight bulbs, ideally thats around 5500 Kelvins or a little more, these are sold at most DIY or lighting stores
For a more professional set-up and for larger works, 2 box lamps or similar lamps are better because the illumination is more even, these type of lamps are used by photographers.


Editing on Phones
Some editing of images taken n the phone cameras is almost always needed - this includes rotating images and cropping them but also brightening and altering colour or contrast, the aim is to make the digital image as close as possible to the original artwork. Here you can see some of the most used icons when editing images on your phone.
To Edit Orientation, Size and Shape (see phone features video)
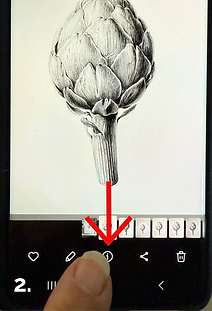
Rotate: The orientation of an image can very easily be changed, so please do not sent images sideways or upside down. To rotate images on your phone, Launch the Photos app and select the image. On an iPhone select the crop option and then the square with the arrow curving over from the top right.
Adjust Distortion or angle: If you have taken a photograph square-on, you shouldn't need these options but if the image is isn't quite straight you can adjust an angle to make the image square
Adjust Brightness: you can brighten the image but careful of brightening images as this can misrepresent the artwork.
On a phone, some adjustment of brightness can also be used when the photograph is taken, as shown in the video section on this web page but remember that further editing can also be done after the photograph has been taken using the brightness tool.
Crop: Use the crop tool to drag the outer border in to create the correct aperture for the image and save.
Your image is now ready for naming.


Note: There are many other tools such as contrast, warmth and more - but I will discuss these in a new video. There are also many image editing apps, such as Snapseed but you can edit images on your phone which will suffice for the course.
you can also upload the images to a computer for editing, I use Photoshop for this purpose, but there are many other option. More to follow
Naming Your Images on Phones
All images should have a file name that is the course exercise and module name, and not the auto generated numbers that the phone automatically labels the image
On Android phones such as Samsung Galaxy phones
1. Go to the image library and select the image that you want to use,
2. Click on the information symbol, (i) below the image.
3. This will open the screen with file name with date and file name, click on 'Edit'
4. Hold your finger on the file name, choose 'Select all' then 'Cut' which removes the numeric name (no image included)
5. Use the keyboard to type the new file name, for example, 'Exercise 8 Graphite'
6. click 'Save' and you will now see the image with the new name beneath it
7. You can send the image directly from here
or Can open the email programme and attach multiple images but be aware that there is a limit to the total size of images that can be sent (usually around 25MB) if your images add up to more, consider sending in a couple of separate emails or by using an Image transfer App such as WeTransfer.
On iPhones
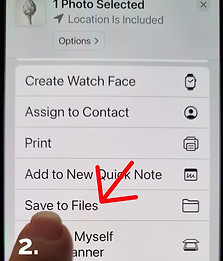
The process of changing the file name is slightly different and you first have to save the image to your Files on your phone
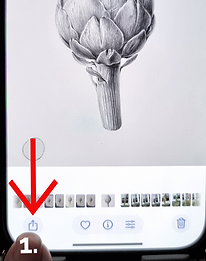
1. Go to the image library and select the image, then click the share icon - that's the square with an arrow pointing upwards, usually at the bottom left of the screen
2. This next screen will show the image with a blue tick, scroll down until you come to the 'Save to Files' option and select it
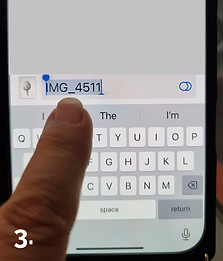
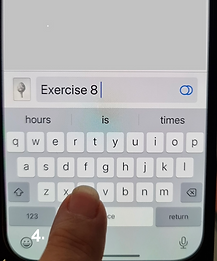
3. The image will show at the bottom of the screen with the file name next to it e.g. IMG_4511, click on the name -
4. Now you can retype the name, e.g. Exercise 8 Graphite. Click 'Save' - top right of the screen.
5. Locate the files icon on your Home Screen or search the App Library. You will see the renamed file, which you can send directly from there
OR
6. Open your email and compose a new email, click the attachment icon (the paperclip). From the menu that appears, select 'Files', you will now see your renamed images and can select the ones you wan to send.
Note that if the files are very large (they shouldn't be too large if you have edited them) or if there a lot of files you may need to send them in more than one email. Or send via an image transfer App, such as WeTransfer.
See section on videos below for further guidance


Supporting Videos on Photographing and Editing on a Smart Phone
Taking Photographs and naming the File on and Android Phone
Scanning Artwork
Professional scanning isn’t practical—or cost-effective—for most coursework, except perhaps for final pieces. That said, there are some excellent home flat bed scanners and scanning in your own studio can give you some of the cleanest, most accurate results, provided the scanner itself is good quality.
The scanners built into home printers usually aren’t suitable; they tend to wash out the image, lose fine detail, and produce inaccurate colours. Even though the resolution may say it's good enough, at say 600dpi, the technology within the scanner isn't up to the job.
A dedicated flat-bed scanner is definitely an investment, but it can save you the ongoing cost of professional scanning services and will give you far greater control over your images. But if you have a good scanner you also need a computer capable of dealing with large images.
For many artists, photographing work will be enough in the early stages. But if you want consistently better results—especially if you plan to be a professional artist or teach, you can produce step-by-step resources, create prints of smaller works such as cards, or, as I do, prepare artwork for commercial illustration—then a good scanner is well worth considering. It's even good enough for entering exhibitions and yields true white backgrounds at a high enough resolution for some print jobs, such as cards. but for quality prints you will need a professional scanning service with colour matching service.
I personally use an A4 Epson Perfection V550 Photo scanner, which I had for years and its paid for itself many times over. It’s an excellent machine, though sadly no longer in production. If you happen to find one second-hand or even better a V600 then do - I highly recommend it, they can be found for around £250.
Epson’s closest models newer models are the Epson Perfection V750 and most recently the V850, which retails at around £875, though I haven’t tested it myself. It scans artwork up to 4,800 dpi
Scanner Size
Your first thought might be that an A4 scanner is too small but an A3 scanner isn’t necessary and is very expensive (over 3,000 gbp) but larger images can be scanned in sections using an A4 scanner and then merged digitally with excellent results and very little Photoshop knowledge.
Also, Photoshop often comes as part of a bundle when you purchase a new scanner. Scanners also have their own software but I find Photoshop easier to use.
Programs like Photoshop make this image stitching straightforward—you simply scan each part and piece them back together on-screen using the Automate function and only minimal editing is needed.
I will included step-by-step instructions for doing this below.
More to follow


Emailing the Artwork
Sending Jpeg attachments
Once your images are cropped, cleaned and named they are ready to send. They can be send as Jpegs as an email attachment and this should be relatively easy to do.
The main issue with emailing images is that the email programme can compress the images, this varies between providers, so it can be difficult to advise.
Also, with different email accounts, there may be size limitations, if your image is too large it may still be compressed or rejected. Check your providers limitations or send multiple images in several emails.
TRY SENDING A TEST EMAIL TO YOURSELF FIRST TO CHECK IMAGE QUALITY AND TO CONFIRM DELIVERY
Image transfer Application WeTransfer option
The alternative is to use an image transfer application Wetransfer- but unpaid versions have limitations. However, I have a paid account for WeTransfer under the email address info@diannesutherland.com - so can access your images for longer than 3 days, but please let me know if you have sent images via Wetransfer.
Please do not use any other email transfer service, such as Drop Box as I do not have an account for it.
Here are a few scenarios for sending at full resolution with different email providers:
Apple will ask if you a range of sizes when you add an image to an email, so simply choose 'Original Size' or you can use Mail Drop which sends a link.
In Outlook, you have to go to open the Outlook application, then choose File > Options (or File >Info > Image attachment in some versions)
Then click on 'Mail' in the menu > Click Editor options: Advanced Settings > Select advanced tab > Disable Compression: under 'Image Size and File Quality' check the box 'Do Not Compress Images in file' > Set 'High Fidelity' from the default resolution box> Confirm changes by clicking 'OK'